Thursday, April 26, 2018

Fire Separation Doors from the House to the Garage

I’d like everyone to take a minute to think about two potentially very dangerous situations.  Both of them have to do with your garage.  If your garage is attached to your house, you should have a door between them.  The door needs to be able to withstand a fire in the garage, as well as help keep deadly gasses from seeping through (like Carbon Monoxide).  Because of these threats, the door must meet some very specific requirements.  These are addressed in the International Residential Code:
“R302.5.1 Opening protection. Openings from a private garage directly into a room used for sleeping purposes shall not be permitted. Other openings between the garage and residence shall be equipped with solid wood doors not less than 1-3/8 inches (35 mm) in thickness, solid or honeycomb-core steel doors not less than 1-3/8 inches (35 mm) thick, or 20-minute fire-rated doors, equipped with a selfclosing device.”
Fire resistance:  The door must be able to withstand a fire in the garage long enough for you to get out of the house.  Preferably long enough for the fire department to get there and extinguish the fire.  One of the most common defects I find in my area is that the door isn’t thick enough.  The common practice here is to use a solid wood door, which would normally be fine.  However, a flat panel door doesn’t seem to fit in the decor of all the houses here, so most often I see 6-panel doors.  These doors are about 1-5/8″ – 1-3/4″ thick, but if you measure the thickness at the recesses in the door, it’s less than 1-3/8″.  These doors do not meet the stated requirement, and should be replaced with a door that does.
Self-Closing:  This requirement is there for one purpose, to make sure the door is fully closed so that it can do its job.  It can’t keep fire and carbon monoxide out of the house if it’s open.  The way the requirement is written, a lot of people read it that a self-closing device is only required on 20-minute fire-rated doors.  The confusion comes about because of the oxford comma before the last requirement.  I reached out to the International Code Council (the group that writes the International Residential Code) for clarification, and they replied: “The self-closing device is a requirement for all the types of doors mentioned in Section R302.5.1”
So, please take a minute and go check the door to your garage.  If it looks like the door in this picture, you probably have an improper door.  Also make sure that the self-closing devices reliably close the door to the point the latch catches.  If not, have them adjusted.  Your safety could depend on it.
Improper Fire Door
Improper Fire Door
Of course this is just one of the many things we inspect during our comprehensive home inspection.  To book your inspection, call 210-202-1974, or click here to book online.

Wednesday, April 25, 2018

Arc-Fault Circuit Interrupters (AFCI)

We frequently get asked what the difference is between AFCI and GFCI protection is.  Here is a short post about AFCIs, describing their function, as well as their importance.

Arc-fault circuit interrupters (AFCIs) are special types of electrical receptacles or outlets and circuit breakers designed to detect and respond to potentially dangerous electrical arcs in home branch wiring.

How do they work?
AFCIs function by monitoring the electrical waveform and promptly opening (interrupting) the circuit they serve if they detect changes in the wave pattern that are characteristic of a dangerous arc. They also must be capable of distinguishing safe, normal arcs, such as those created when a switch is turned on or a plug is pulled from a receptacle, from arcs that can cause fires. An AFCI can detect, recognize, and respond to very small changes in wave pattern.

What is an arc?
When an electric current crosses an air gap from an energized component to a grounded component, it produces a glowing plasma discharge known as an arc. For example, a bolt of lightening is a very large, powerful arc that crosses an atmospheric gap from an electrically charged cloud to the ground or another cloud. Just as lightning can cause fires, arcs produced by domestic wiring are capable of producing high levels of heat that can ignite their surroundings and lead to structure fires.

According to statistics from the National Fire Protection Agency for the year 2005, electrical fires damaged approximately 20,900 homes, killed 500 people, and cost $862 million in property damage. Although short-circuits and overloads account for many of these fires, arcs are responsible for the majority and are undetectable by traditional (non-AFCI) circuit breakers.

Where are arcs likely to form?
Arcs can form where wires are improperly installed or when insulation becomes damaged. In older homes, wire insulation tends to crystallize as it ages, becoming brittle and prone to cracking and chipping. Damaged insulation exposes the current-carrying wire to its surroundings, increasing the chances that an arc may occur.

Situations in which arcs may be created:

  • electrical cords damaged by vacuum cleaners or trapped beneath furniture or doors.
  • damage to wire insulation from nails or screws driven through walls.
  • appliance cords damaged by heat, natural aging, kinking, impact or over-extension.
  • spillage of liquid.
  • loose connections in outlets, switches and light fixtures.
Where are AFCIs required?
Locations in which AFCIs are required depend on the building codes adopted by their jurisdiction.

The 2006 International Residential Code (IRC) requires that AFCIs be installed within bedrooms in the following manner:
E3802.12 Arc-Fault Protection of Bedroom Outlets. All branch circuits that supply120-volt, single-phase, 15- and 20-amp outlets installed in bedrooms shall be protected by a combination-type or branch/feeder-type arc-fault circuit interrupter installed to provide protection of the entire branch circuit.
Exception: The location of the arc-fault circuit interrupter shall be permitted to be at other than the origination of the branch circuit, provided that:
  1. The arc-fault circuit interrupter is installed within 6 feet of the branch circuit overcurrent device as measured along the branch circuit conductors, and
  2. The circuit conductors between the branch circuit overcurrent device and the arc-fault circuit interrupter are installed in a metal raceway or a cable with metallic sheath.
The National Electrical Code (NEC) offers the following guidelines concerning AFCI placement within bedrooms:
Dwelling Units. All 120-volt, single phase, 15- and 20-ampere branch circuits supplying outlets installed in dwelling unit in family rooms, dining rooms, living rooms, parlors, libraries, dens, sun rooms, recreation rooms, closets, hallways, or similar rooms or areas shall be protected by a listed arc-fault circuit interrupter, combination-type installed to provide protection of the branch circuit.
What types of AFCIs are available?
AFCIs are available as circuit breakers for installation in the electrical distribution panel, as well as replacement receptacles to add protection on household circuits.. 
Nuisance Tripping
An AFCI might activate in situations that are not dangerous and create needless power shortages. This can be particularly annoying when an AFCI stalls power to a freezer or refrigerator, allowing its contents to spoil. There are a few procedures an electrical contractor can perform in order to reduce potential “nuisance tripping," such as:
  • Check that the load power wire, panel neutral wire and load neutral wire are properly connected.
  • Check wiring to ensure that there are no shared neutral connections.
  • Check the junction box and fixture connections to ensure that the neutral conductor does not contact a grounded conductor.
Arc Faults vs. Ground Faults
It is important to distinguish AFCI devices from Ground Fault Circuit Interrupter (GFCI) devices. GFCIs detect ground faults, which occur when current leaks from a hot (ungrounded) conductor to a grounded object as a result of a short-circuit. This situation can be hazardous when a person unintentionally becomes the current’s path to the ground. GFCIs function by constantly monitoring the current flow between hot and neutral (grounding) conductors, and activate when they sense a difference of 5 milliamps or more. Thus, GFCIs are intended to prevent personal injury due to electric shock, while AFCIs prevent personal injury and property damage due to structure fires.
 
In summary, AFCIs are designed to detect small arcs of electricity before they have a chance to lead to a structure fire. 


Now, before you go further, go to your electric panel, and make sure you have AFCI breakers.  Push the test button on each one, and make sure it trips and you can reset it.  If it doesn't trip, or you can't reset it, call an electrician to have it replaced.  Make sure you test these breakers monthly.

To schedule your comprehensive home inspection (which of course includes an electrical inspection) either on a new home, or a home you already own, call 210-202-1974 or click here.

by Nick Gromicko, Mike Marlow and Kenton Shepard

Saturday, April 7, 2018

Garage Doors

Garage doors are large, spring-supported doors. Garage door openers control the opening and closing of garage doors, either through a wall-mounted switch or a radio transmitter. Due to the strain that garage door components and openers regularly endure, they may become defective over time and need to be fixed or replaced. Defective components may create safety hazards as well as functional deficiencies to the garage door assembly.
 
The following facts demonstrate the dangers posed by garage doors:
  • Garage doors are typically among the heaviest moving objects in the home and are held under high tension.
  • Injuries caused by garage doors account for approximately 20,000 emergency room visits annually, according to the U.S. Consumer Product Safety Commission.
  • The majority of the injuries caused by garage doors are the result of pinched fingers, although severe injuries and deaths due to entrapment occur as well. Sixty children have been killed since 1982 as a result of garage doors that did not automatically reverse upon contact.
Home owners should not attempt to fix any garage door defects they may encounter. They should have the door examined and repaired by a trained garage door technician. The following components should be present and devoid of defects:
 
  • manual (emergency) release handle. All garage doors should be equipped with this device, which will detach the door from the door opener when activated. It is vital during emergency situations, such as when a person becomes trapped beneath the door or when a power outage cuts electricity to the door opener. Periodically activate the handle to make sure that it works, although they will have to reset the handle if it does not reset automatically. In order for the handle to be accessible and obvious, it must be…
  1. colored red;
  2. easily distinguishable from rest of the garage opener system; and
  3. no more than 6 feet above the standing surface.
  • door panels. Both sides of the door should be examined for the following:
  1. fatigue;
  2. cracking and dents. Aluminum doors are especially vulnerable to denting; and
  3. separation of materials.
  • warning labels. The following four warning labels should be present on or around garage door assemblies:
  1. a spring warning label, attached to the spring assembly;
  2. a general warning label, attached to the back of the door panel;
  3. a warning label attached to the wall in the vicinity of the wall control button, and;
  4. a tension warning label, attached to garage door’s bottom bracket.
  • brackets and roller shafts.
    1. Brackets. The garage door opener is connected to the garage door by a bracket that is essential to the function of the door opener system. Placement of the bracket where it attaches to the door is crucial to the operation of its safety features. It should attach 3 to 6 inches from the top of the door. This bracket, as well as all other brackets, should be securely attached to their surfaces.
    2. Roller shafts. Roller shafts should be longer on the top and bottom rollers. The top rollers are the most important. Without longer shafts, if one side of the door hangs up, the door may fall out of the opening.
  • door operation. The door’s operation can be tested by raising the door manually, grasping the door’s handles if it has them. You can then make sure that the door:
    1. moves freely;
    2. does not open or close too quickly; and
    3. opens and closes without difficulty.
Note:  Do not operate the door until you have inspected the track mounts and bracing. Doors have been known to fall on people and cars when they were operated with tracks that were not securely attached and supported.
  • extension spring containment cables. Older garage doors may use extension springs to counter-balance the weight of the door. These require a containment cable inside the spring to prevent broken parts from being propelled around the garage if the spring snaps. Most new garages use shaft-mounted torsion springs that do not require containment cables.
  • wall-mounted switch. This device must be present and positioned as high as is practical above the standing surface (at least five feet as measured from the bottom of the switch) so that children do not gain access.
In addition, the button must:
  1.    be mounted in clear view of the garage door; and
  2.    be mounted away from moving parts.
Important note:  You should always make sure to disable the manual lock on the garage door before activating the switch.
  • automatic reverse system. As of 1991, garage doors are required to be equipped with a mechanism that automatically reverses the door if it comes in contact with an object. It is important that the door reverses direction and opens completely, rather than merely halting. If a garage door fails this test, get it repaired. A dial on the garage door opener controls the amount of pressure required to trigger the door to reverse. This dial can be adjusted by a qualified garage door technician if necessary.
Methods for testing the automatic reverse system:
  1. This safety feature can be tested by grasping the base of the garage door as it closes and applying upward resistance. Use caution while performing this test because you may accidentally damage its components if the door does not reverse course.
  2. Some sources recommend placing a 2x4 piece of wood on the ground beneath the door, although there have been instances where this testing method has damaged the door or door opener components.
  • supplemental automatic reverse system. Garage doors manufactured in the U.S. after 1992 must be equipped with photoelectric sensors or a door edge sensor.
    1. Photoelectric eyes. These eyes (also known as photoelectric sensors) are located at the base of each side of the garage door and emit and detect beams of light. If this beam is broken, it will cause the door to immediately reverse direction and open. For safety reasons, photo sensors must be installed a maximum of 6 inches above the standing surface.
    2. Door edge sensors. This device is a pressure-sensitive strip installed at the base of the garage door. If it senses pressure from an object while the door is closing, it will cause the door to reverse. Door edge sensors are not as common in garage door systems as photoelectric eyes.
 
Safety Advice for Home Owners:
  • Homeowners should not attempt to adjust or repair springs themselves. The springs are held under extremely high tension and can snap suddenly and forcefully, causing serious or fatal injury.
  • No one should stand or walk beneath a garage door while it is in motion. Adults should set an example for children and teach them about garage door safety. Children should not be permitted to operate the garage door opener push button and should be warned against touching any of the door’s moving parts.
  • Fingers and hands should be kept away from pulleys, hinges and springs, and the intersection points between door panels. Closing doors can very easily crush body parts that get between them.
  • The automatic reversal system may need to be adjusted for cold temperatures, since the flexibility of the springs is affected by temperature. This adjustment can be made from a dial on the garage door opener, which should be changed only by a trained garage door technician.
In summary, garage doors and their openers can be hazardous if certain components are missing or defective. Inspectors should understand these dangers and be prepared to offer useful safety tips to their clients.
Inspecting the garage door and installed openers is just one of the many things we inspect during a Veteran Home Inspection.  To schedule your inspection, call 210-202-1974 or book online at www.vhillc.com.

Thursday, March 29, 2018

Dryer Vent Safety

One of the most common issues we note during home inspections is with dryer ducts.  For what appears to be a simple system, there are some very important intricacies that have to be followed to make sure they are safe.
Clothes dryers evaporate the water from wet clothing by blowing hot air past them while they tumble inside a spinning drum. Heat is provided by an electrical heating element or gas burner. Some heavy garment loads can contain more than a gallon of water which, during the drying process, will become airborne water vapor and leave the dryer and home through an exhaust duct (more commonly known as a dryer vent).
A vent that exhausts moist air to the home's exterior has a number of requirements:
  1. It should be connected. The connection is usually behind the dryer but may be beneath it. Look carefully to make sure it’s actually connected.
  2. It should not be restricted. Dryer vents are often made from flexible plastic or metal duct, which may be easily kinked or crushed where they exit the dryer and enter the wall or floor. This is often a problem since dryers tend to be tucked away into small areas with little room to work. Vent elbows are available which is designed to turn 90° in a limited space without restricting the flow of exhaust air. Restrictions should be noted in the inspector's report. Airflow restrictions are a potential fire hazard.
  3. One of the reasons that restrictions are a potential fire hazard is that, along with water vapor evaporated out of wet clothes, the exhaust stream carries lint – highly flammable particles of clothing made of cotton and polyester. Lint can accumulate in an exhaust duct, reducing the dryer’s ability to expel heated water vapor, which then accumulates as heat energy within the machine. As the dryer overheats, mechanical failures can trigger sparks, which can cause lint trapped in the dryer vent to burst into flames. This condition can cause the whole house to burst into flames. Fires generally originate within the dryer but spread by escaping through the ventilation duct, incinerating trapped lint, and following its path into the building wall.
InterNACHI believes that house fires caused by dryers are far more common than are generally believed, a fact that can be appreciated upon reviewing statistics from the National Fire Protection Agency. Fires caused by dryers in 2005 were responsible for approximately 13,775 house fires, 418 injuries, 15 deaths, and $196 million in property damage. Most of these incidents occur in residences and are the result of improper lint cleanup and maintenance. Fortunately, these fires are very easy to prevent.
The recommendations outlined below reflect International Residential Code (IRC) SECTION M1502 CLOTHES DRYER EXHAUST guidelines:
M1502.5 Duct construction.
Exhaust ducts shall be constructed of minimum 0.016-inch-thick (0.4 mm) rigid metal ducts, having smooth interior surfaces, with joints running in the direction of air flow. Exhaust ducts shall not be connected with sheet-metal screws or fastening means which extend into the duct.
This means that the flexible, ribbed vents used in the past should no longer be used. They should be noted as a potential fire hazard if observed during an inspection.
M1502.6 Duct length.
The maximum length of a clothes dryer exhaust duct shall not exceed 25 feet (7,620 mm) from the dryer location to the wall or roof termination. The maximum length of the duct shall be reduced 2.5 feet (762 mm) for each 45-degree (0.8 rad) bend, and 5 feet (1,524 mm) for each 90-degree (1.6 rad) bend. The maximum length of the exhaust duct does not include the transition duct.
This means that vents should also be as straight as possible and cannot be longer than 25 feet. Any 90-degree turns in the vent reduce this 25-foot number by 5 feet, since these turns restrict airflow.
A couple of exceptions exist:
  1. The IRC will defer to the manufacturer’s instruction, so if the manufacturer’s recommendation permits a longer exhaust vent, that’s acceptable. An inspector probably won’t have the manufacturer’s recommendations, and even if they do, confirming compliance with them exceeds the scope of a General Home Inspection.
  2. The IRC will allow large radius bends to be installed to reduce restrictions at turns, but confirming compliance requires performing engineering calculation in accordance with the ASHRAE Fundamentals Handbook, which definitely lies beyond the scope of a General Home Inspection.
M1502.2 Duct termination.
Exhaust ducts shall terminate on the outside of the building or shall be in accordance with the dryer manufacturer’s installation instructions. Exhaust ducts shall terminate not less than 3 feet (914 mm) in any direction from openings into buildings. Exhaust duct terminations shall be equipped with a backdraft damper. Screens shall not be installed at the duct termination.
We see many dryer vents terminate in crawlspaces or attics where they deposit moisture, which can encourage the growth of mold, wood decay, or other material problems. Sometimes they will terminate just beneath attic ventilators. This is a defective installation. They must terminate at the exterior and away from a door or window. Also, screens may be present at the duct termination and can accumulate lint and will be noted as improper.
M1502.3 Duct size.
The diameter of the exhaust duct shall be as required by the clothes dryer’s listing and the manufacturer’s installation instructions.
Look for the exhaust duct size on the data plate.
M1502.4 Transition ducts.
Transition ducts shall not be concealed within construction. Flexible transition ducts used to connect the dryer to the exhaust duct system shall be limited to single lengths not to exceed 8 feet (2438 mm), and shall be listed and labeled in accordance with UL 2158A.
Required support for lengthy ducts is covered by the following section:
M1502.4.2 Duct installation.Exhaust ducts shall be supported at intervals not to exceed 12 feet (3,658 mm) and shall be secured in place. The insert end of the duct shall extend into the adjoining duct or fitting in the direction of airflow. Exhaust duct joints shall be sealed in accordance with Section M1601.4.1 and shall be mechanically fastened. Ducts shall not be joined with screws or similar fasteners that protrude more than 1/8-inch (3.2 mm) into the inside of the duct.
In general, we may not know specific manufacturer’s recommendations or local applicable codes and will not be able to confirm the dryer vent's compliance to them, but will be able to point out issues that may need to be corrected.

To schedule your home inspection, visit www.vhillc.com or call 210-202-1974
by Nick Gromicko, Mike Marlow, and Kenton Shepard

Tuesday, March 13, 2018

Home Repair Rip-offs

by Nick Gromicko and Mike Marlow
 Here in Texas, every time we get a hail storm through the area, the shady contractors show up offering to replace your roof.  Additionally, contractors don’t have to be licensed except in the larger cities, so anyone can call themselves a contractor.  It’s truly buyer beware around here, so read on to learn more about some of the schemes that are pulled.
Homeowners have more to worry about than being ripped off by shady contractors in this lagging economy, but such a climate brings desperation — and with it, sadly, fraud. Of course, the majority of tradesmen are generally honest professionals, but there is a large number of unscrupulous contractors who will fix items that don’t need fixing, or grossly overcharge you for services or parts. Worse, there are plenty of con artists posing as tradesmen who will simply take your money and run. Inspectors are often the first ones to uncover such fraud, so they too need to be familiar with its common forms in order to best serve their clients.Yes, this fortress was made by thousands of termites, but it is not evidence that any of them have entered your house.
Some common home repair scams include:
  • roof work. Con artists are known to travel from state to state following natural disasters and looking for victims of storms. Beware of people who suddenly arrive in your neighborhood, offering to fix your roof at a discount. Also, don’t trust a roofer who makes an assessment of a leaky roof from the ground without examining it. Very often, the flashing is all that needs to be replaced, even when the tradesman tries to convince you that you need a whole new roof.
  • driveway sealers.  This time-honored grift has a tradesmen pulling up to your home in his truck and offering to re-seal your driveway using leftover “sealant” from a job “just down the block.”  The low price is unbelievable, and so is the job.  Generally, the sealant is paint or some other cheap, black spray media that will quickly wash away with the next rain.
  • termites. Myths that exaggerate the dangers of termites abound, and homeowners can be easily duped into unnecessary treatment. Ask for prices from more than one company and compare their services. Make sure to get a guarantee that covers you in case termites return within a given period of time. Read the guarantee and the rest of the contract carefully before you sign! Be on guard for the following ruses:
    • The exterminator shows you termites on a fence or woodpile that is not connected to your house. If he were competent and honest, he would know that these termites pose no threat to your home.
    • He (but not you) witnesses “evidence.” Make the exterminator show you the alleged evidence of the infestation. Termite-damaged wood is hollowed out along the grain, with bits of soil or mud lining the galleries.
    • He offers a free termite inspection, and his motives are questionable to begin with. He may bring the evidence to your house with him.
  • chimney sweeps. Beware of any chimney sweep who arrives at your door unannounced, offering to perform his services for a low price. He might say that he’s just worked on your neighbor’s chimney, and offer you a suspiciously low price for a sweep. The inspection will uncover “problems” that quickly balloon the price.
  • HVAC specialists. The most common HVAC rip-offs are replacing parts that work fine and substituting used parts for new ones. If you get suspicious, ask to see the alleged broken parts before they’re replaced, and look at the packaging and documentation for the new parts before they’re installed. If possible, have HVAC work performed in the off-season, as it may be significantly cheaper.
  • plumbers. Parts cost plumbers only a tiny fraction of the total charge for their services, but some plumbers will still cut corners to boost their profit. They may use plastic or low-grade metal, for instance, or 1/2-inch pipe instead of 3/4-inch pipe. Ask what they are installing and how long the parts will last.
  • painters. Some painters agree to use a specific brand of high-quality paint, then pour cheap paint into name-brand cans. Most of the cans the painter brings with him should be sealed when the job is started. If not, ask why. Other painters skimp on the prep work.
Homeowners should heed the following advice whenever they hire a contractor:
  • Go to OverSeeIt.com to find an InterNACHI inspector who will stop by and make sure your construction project is done right.
  • If you are calling a contractor for an estimate and you live in an affluent neighborhood, don’t mention your address or phone number until you get the estimate. You can even call a tradesman in a less wealthy town or neighborhood that’s nearby, as their price will likely be lower than the going rate in your area.
  • Try to negotiate a flat rate if the tradesman has no idea how much the job is going to cost. This is especially helpful in plumbing work, as almost all pipes are hidden behind walls and the job can easily become more complicated than originally planned.
  • Ask if the tradesman charges for travel time. If he does, it may be cheaper to choose someone who is closer. Also ask if he charges for time spent traveling to supply stores.
  • Know your contractor. Be sure he is licensed, and get a written agreement stating the cost and the work to be performed.
  • Beware of any contractor who shows up at your door unannounced or calls you on the phone. Con artists must move every so often to frustrate law enforcement, so they have no fixed address and rely on door-to-door or phone solicitation. For the same reason, their invoices may contain only a P.O. box rather than a street address.
  • Always be wary of a contractor who recommends a particular company or individual after “discovering” a problem, as he will probably receive a kickback for the referral, so you cannot trust his advice.
  • Beware of a contractor who tries to unnecessarily increase the scope of a project. Also known as an upseller, these people will do the following:
    • not offer you a range of options, including cheaper alternatives or work that is different than what you had anticipated; or
    • use scare tactics to persuade you to take his recommendations.
  • Beware of contractors who insist that they are  charging you only for what they paid for the materials, if they are, in fact, making a profit on the materials. Material over-charging is unethical if the contractor lies about it.
  • Beware of material-swapping, in which the contractor will buy premium products and make you reimburse him, but then he returns the product for something cheaper and of lower quality, and pockets the difference. If you suspect material-swapping, you can uncover the farce at the end of the job by comparing the packaging with the products listed on the receipt.
  • Do not give a large down-payment. It may be appropriate to pay a small percentage of the total estimate up front, but if the contractor asks for most (or all) of the money up front, he may be a con artist. Even if he does return to perform the work, he may botch the job or leave it unfinished, leaving you with little power to contest. And, of course, never pay in cash.
  • If you are elderly, be on heightened alert for scammers because you will be targeted more often than your children.
In summary, homeowners and inspectors alike should be wise to the plethora of ways that home repair contractors, or those posing as such, rip off their clients.  Don’t be afraid to call Veteran Home Inspections at 210-202-1974 to have us inspect your home for needed repairs, or to check up on your contractor’s work.  We do not work on houses we inspect, so we are completely impartial.  You can also check us out online at www.vhillc.com

Friday, March 9, 2018

Foreclosure Home Inspections - Trust Your Gut

So, you want to buy a house cheap, and you look to the foreclosure market. Considering the over-abundance of these properties and just how little many of them are going for, it’s tempting to jump on the bandwagon and buy up. And it may pay off as a long-term investment.  But, like any other major purchase, you should know as much as you can about a property before you buy it, which is why home inspections, performed by certified InterNACHI inspectors, are necessary.
 
Unfortunately, many real estate agents, who don’t like bargaining with banks, are advising clients that home inspections are of no value as a bargaining tool, since banks don’t negotiate on “as is” properties. As an added disincentive, banks selling properties “as is” have no legal responsibility for any lurking defects. While the agent's advice to forgo an inspection as a means to negotiate on the price may be logical, it is startlingly counter-intuitive, and possibly even negligent. Would you buy a car without knowing whether it has a transmission?  The same premise holds true for a house, regardless of whether you intend to live in it, or fix it and flip it. The Realtor may be trying to salvage a deal that could possibly be scrapped if an inspector uncovers damage that the bank is unwilling to pay for, and you, as the buyer, have to realize that the agent's advice is not in your best interest. In this case, they’re putting you at risk in order to ensure they get their commission.
 
Any Realtor advising against an inspection on a foreclosure (or neglecting to recommend that one be performed) is ignoring the likelihood that, long before the previous owners stopped making mortgage payments, they deferred required maintenance tasks. Moisture intrusion leading to leaks and mold are just a few of the major problems commonly found by inspectors in foreclosed properties.  Tales abound of bizarre discoveries in abandoned properties, from wild boars to colossal bees nests. Former owners may loot their own properties, taking with them anything they can pry up or unscrew, and leave behind trash and junk that you have to pay for to have removed.
 
There are also stories of foreclosed properties that have been intentionally vandalized by their former owners in acts of retaliation against their banks. In one infamous case in early 2010, an Ohioan bulldozed his $250,000 home after the IRS placed liens on his carpet store, and then threatened to take his house. The damage done by the owner was apparent, but there are probably less extreme situations where the damage isn’t as obvious, making a home inspection of utmost priority.
 
You should always get a home inspection before buying a property, especially when you’re buying a bank-owned foreclosure.  In such cases, it may be impossible to find out how well the home was cared for, or whether major damage was done right before the past owners left the property. Ask the bank how much time you have after your initial offer to have an inspection performed, and schedule one immediately. If it goes well, you’ll enter into the deal with peace of mind and a better idea of what repairs you’ll have to deal with. That alone is worth the price of an inspection. If the inspection reveals a costly disaster, you can back out of the deal and save tens or even hundreds of thousands of dollars.

To schedule your home inspection, call 210-202-1974, or visit www.vhillc.com/request-inspection to schedule online.

by Nick Gromicko, Mike Marlow, and Kate Tarasenko

Monday, March 5, 2018

What Every Home Inspector Wished Their Home Buyers Knew

We were recently asked to contribute to an article about what we wished our clients knew about the home inspection process.  Here is the final article: http://bit.ly/2oRYkv0 and there is some great information from some very experienced home inspectors.

Friday, March 2, 2018

Modular vs. Manufactured Homes

While the terms “modular home” and “manufactured home” refer to two very different things, they are sometimes used interchangeably. Perhaps some of this confusion stems from the fact that modular homes are, in fact, manufactured (“manufactured” might be an unfortunate label.) Also, traditional “site-built” homes are not necessarily better than modular homes, despite the stigma associated with their assembly-line origin. There have been cases where Realtors and builders of manufactured homes have misrepresented manufactured homes as modular homes, and buyers were not informed enough to know the difference. Everyone (especially inspectors, who make their living examining residences) should understand the distinguishing features of these two types of houses.

Modular Homes
 
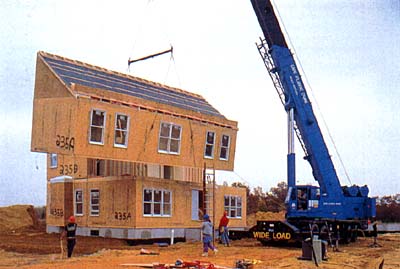
Modular homes are residences constructed entirely in factories and transported to their sites on flatbed trucks. They are built under controlled conditions, and must meet strict quality-control requirements before they are delivered. They arrive as block segments and are neatly assembled, using cranes, into homes that are almost indistinguishable from comparable ones built on-site. Wind and rain do not cause construction delays or warp building materials. In addition, modular homes:
  • must conform to the same local, state and regional building codes as homes built on-site;
  • are treated the same by banks as homes built on-site. They are easily refinanced, for example;
  • follow the same market trends as site-built houses;
  • must be structurally approved by inspectors;
  • can be of any size, although the block sections from which they are assembled are uniformly sized;
  • are often more basic than homes built on-site, but they tend to be sturdier;
  • are highly customizable. Design is usually decided by the buyer before construction has begun; and
  • generally take eight to 14 weeks to construct. Differing from a site-built home, the foundation can be dug at the same time that the house is being constructed.
Proponents of modular homes claim that their indoor, environmentally controlled construction affords them greater strength and resilience than homes built on-site. They also tend to be constructed using more precise building techniques and with more building material than comparable site-built residences. One reason for this is that they must be able to withstand the stress of highway transport. A study by FEMA found that modular homes withstood the wind and water from Hurricane Andrew better than most other homes in the area. They take less time to construct than site-built homes, are more energy-efficient, and generally cost less.

Manufactured Homes
 
The term “manufactured home” is the most recent label for what were once called “mobile homes” or “trailers.” They are relatively inexpensive, small, and are held to less stringent standards than modular and site-built homes. Their obvious advantages are their mobility and affordability, factors that allow buyers to make home purchases without a serious monetary or geographical commitment. They are available in three sizes that escalate as follows: “single-wide,” “double-wide” and “triple-wide.” In addition, manufactured homes:
  • conform only to Housing and Urban Development (HUD) code. Some homes contain a red tag that confirms that the unit was manufactured in compliance with this code;
  • are inspected, but do not have to be structurally approved by an inspector;
  • are manufactured in sections at factories;
  • are never more than one story;
  • do not have a permanent or conventional foundation;
  • tend to lose value over time because they are difficult to expand or improve;
  • are transported to the site on their own wheels;
  • are transported on steel chassis that are never removed;
  • are often placed on property owned by others, such as public land that is leased by the homeowner;
  • are treated as a separate lending category from modular and on-site built homes; and
  • are rarely custom-designed. The buyer can choose from homes that have already been built and receive it within days.
Despite their manufacturing process, modular homes are essentially the same as homes that are built on-site. They are treated the same under the law, and their basic structural features are almost indistinguishable from site-built homes, once assembled. Manufactured homes are relatively small, inexpensive, mobile residences that require a smaller commitment than is required by modular and site-built homes. It is important to understand the differences between these home types in order to reduce the influence of stigmas, misrepresentation and ignorance.
 
Many lenders will also ask for a foundation certification from an engineer to certify that the foundation is proper.  Through our partnership with an engineering firm, we can handle this requirement at the same time as the home inspection.
 
To have your modular or manufactured home inspected, call Veteran Home Inspections at 210-202-1974 or visit www.vhillc.com to book online.

Thursday, March 1, 2018

Indoor Air Quality is a Rising Concern for Home Buyers

The spring and summer months are the busiest time of year for the real estate market. Whether you are building your dream home or purchasing an older home that has been listed on the market, indoor air quality should be a major priority during your search. Learn about how you can make sure your future home’s air is safe and healthy by addressing these concerns BEFORE you buy.
Indoor air concerns when building new construction:
Opting to build a new home will provide you with the greatest opportunity to ensure your indoor air quality is healthy. During the past decade, home builders have documented a sharp increase in the number of buyers looking for eco-friendly building materials. From cabinets to flooring, buyers want to purchase materials that are sustainable for the environment and free of dangerous chemicals such as formaldehyde.
Builders that are able to address a buyer’s health concerns about toxic building materials and indoor air quality have a higher perceived home value and positive brand impact when compared to other builders. Buyers are willing to spend more money in order to select from eco-friendly building materials that are not only better for the environment but that are also better for your family.
Indoor air concerns when buying an existing home:
It will require more diligence on your part when you are buying an existing home and want to ensure you and your family will be breathing clean, healthy air. A home inspection by the highly trained professionals at Veteran Home Inspections can alert you to the presence of organic threats such as mold but you will need to go the extra mile in making sure the home does not contain dangerously high amounts of other chemical toxins.
The recent media coverage concerning high formaldehyde levels found in laminate flooring purchased through Lumber Liquidators has increased consumer awareness in regards to the number of household items and building materials that contain toxic levels of chemicals. As more consumers become aware of the chemical hazards found in flooring, common furniture and cabinet adhesives, particleboard furniture, and dozens of other building materials, consumer demand for safer building materials is on the increase.
The only way you can be certain the air you and your family are breathing is healthy is by performing an IAQ Home Survey test to alert you to the presence of indoor air pollutants. This test will provide you with an extensive and accurate assessment of a home’s air before you move in.
Veteran Home Inspections can provide you with high quality air testing for Volatile Organic Compounds, Formaldehyde, and even Tobacco Smoke Compounds.  Call 210-202-1974 today to schedule your IAQ Home Survey.  You can also schedule online at www.vhillc.com

Do I need an inspection for new construction homes?

In short, YES!
With the amount of new construction going on in this area, an inspection on new construction is critical.  First and foremost, outside of the major cities, there isn’t any code enforcement.  In other words, the city or county doesn’t inspect the builders work.  Some builders will hire their own inspectors to check up on their work, but this is really not sufficient.  I have seen these inspectors on site, and to be honest, I was not impressed.  They work for the builder, and therefore, are beholden to them.  Some have even outright lied and tried to tell buyers that the city inspected it, when they are outside city limits.
Most new construction contracts allow for 2-3 inspections throughout the building process.  The most common are pre-drywall and pre-closing (or final) inspection.  Some will also allow for slab inspections.  Make sure you get an inspector in at every opportunity, as we always find issues.  If you are presented with a contract that limits inspections to less than these, don’t sign it.  Also, beware of clauses that may restrict the inspector.  One large builder recently tried to prevent inspectors from things like inspecting the roof, opening the electric panel, and running appliances.  I think they were publicly shamed into changing their stance on that though (but if you get something like this, let me know).  Also, make sure you can pick your inspector.  Some will try to steer you to the blind inspector that never finds anything major.  We’ve had a couple builders try to blacklist us because we found too much, but thankfully (for our customers) they didn’t succeed.
So, what do we find on new construction?  Just over the last few months we’ve found issues with just about every major component.  Missing rebar in the foundation, damaged and improperly installed roofs, framing deficiencies, improper gas lines, electrical issues galore, heat registers that weren’t hooked up, plumbing leaks too numerous to count, missing insulation, and dangerous decks.
Another inspection that people are starting to get more frequently, is the 11-month warranty inspection.  Almost every new home comes with a 1-year warranty.  Make sure you get an inspection at the 11 month mark, so that we can not only find hidden issues that may have popped up, but we can also document that they were there before the warranty expired.
We know that you are spending a lot of money for your new home, and an inspection is just one more expense.  I can honestly say though, that we have never found less in needed repairs than our fee.  We do offer discounted packages for more than one inspection on a new construction house.
To schedule your new construction home inspection, call 210-202-1974 or visit www.vhillc.com to schedule online.

Septic Systems

Septic systems treat and disperse relatively small volumes of wastewater from individual and small numbers of homes and commercial buildings. Septic system regulation is usually a state and local responsibility. The EPA provides information to homeowners and assistance to state and local governments to improve the management of septic systems to prevent failures that could harm human health and water quality. 
 
Information for Homeowners
If your septic tank failed, or you know someone whose did, you are not alone. As a homeowner, you are responsible for maintaining your septic system. Proper septic system maintenance will help keep your system from failing and will help maintain your investment in your home. Failing septic systems can contaminate the ground water that you and your neighbors drink and can pollute nearby rivers, lakes and coastal waters.
 Ten simple steps you can take to keep your septic system working properly:
  1. Locate your septic tank and drainfield. Keep a drawing of these locations in your records.
  2. Have your septic system inspected at least every three years. Hire an inspector (like Veteran Home Inspections) trained in septic inspections.
  3. Pump your septic tank as needed (generally, every three to five years).
  4. Don’t dispose of household hazardous waste in sinks or toilets.
  5. Keep other household items, such as dental floss, feminine hygiene products, condoms, diapers, and cat litter out of your system.
  6. Use water efficiently.
  7. Plant only grass over and near your septic system. Roots from nearby trees or shrubs might clog and damage the system. Also, do not apply manure or fertilizers over the drainfield.
  8. Keep vehicles and livestock off your septic system. The weight can damage the pipes and tank, and your system may not drain properly under compacted soil.
  9. Keep gutters and basement sump pumps from draining into or near your septic system.
  10. Check with your local health department before using additives. Commercial septic tank additives do not eliminate the need for periodic pumping and can be harmful to your system.
How does it work? 
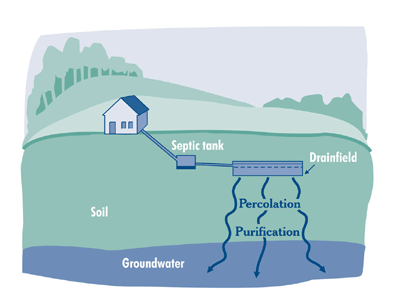
A typical septic system has four main components: a pipe from the home, a septic tank, a  drainfield, and the soil. Microbes in the soil digest and remove most contaminants from wastewater before it eventually reaches groundwater. The septic tank is a buried, watertight container typically made of concrete, fiberglass, or polyethylene. It holds the wastewater long enough to allow solids to settle out (forming sludge), and oil and grease to float to the surface (as scum). It also allows partial decomposition of the solid materials. Compartments and a T-shaped outlet in the septic tank prevent the sludge and scum from leaving the tank and traveling into the drainfield area. Screens are also recommended to keep solids from entering the drainfield. The wastewater exits the septic tank and is discharged into the drainfield for further treatment by the soil. Micro-organisms in the soil provide final treatment by removing harmful bacteria, viruses and nutrients.

Your septic system is your responsibility!

Did you know that, as a homeowner, you’re responsible for maintaining your septic system? Did you know that maintaining your septic system protects your investment in your home? Did you know that you should periodically inspect your system and pump out your septic tank? If properly designed, constructed and maintained, your septic system can provide long-term, effective treatment of household wastewater. If your septic system isn’t maintained, you might need to replace it, costing you thousands of dollars. A malfunctioning system can contaminate groundwater that might be a source of drinking water. And if you sell your home, your septic system must be in good working order.
Pump frequently…
You should have your septic system inspected at least every three years by a professional, and have your tank pumped as necessary (generally every three to five years).
Use water efficiently…
Average indoor water use in the typical single-family home is almost 70 gallons per person per day. Dripping faucets can waste about 2,000 gallons of water each year. Leaky toilets can waste as much as 200 gallons each day. The more water a household conserves, the less water enters the septic system.
Flush responsibly… 
Dental floss, feminine hygiene products, condoms, diapers, cotton swabs, cigarette butts, coffee grounds, cat litter, paper towels, and other kitchen and bathroom waste can clog and potentially damage septic system components. Flushing household chemicals, gasoline, oil, pesticides, anti-freeze and paint can stress or destroy the biological treatment taking place in the system, as well as contaminate surface waters and groundwater.
 
How do I maintain my septic system?
  • Plant only grass over and near your septic system. Roots from nearby trees or shrubs might clog and damage the drainfield.
  • Don’t drive or park vehicles on any part of your septic system. Doing so can compact the soil in your drainfield or damage the pipes, the tank or other septic system components.
  • Keep roof drains, basement sump pump drains, and other rainwater and surface water drainage systems away from the drainfield. Flooding the drainfield with excessive water slows down or stops treatment processes and can cause plumbing fixtures to back up.
Why should I maintain my septic system?
 
A key reason to maintain your septic system is to save money! Failing septic systems are expensive to repair or replace, and poor maintenance is often the culprit. Having your septic system inspected (at least every three years) is a bargain when you consider the cost of replacing the entire system. Your system will need pumping every three to five years, depending on how many people live in the house and the size of the system. An unusable septic system or one in disrepair will lower your property’s value and could pose a legal liability. Other good reasons for safe treatment of sewage include preventing the spread of infection and disease, and protecting water resources. Typical pollutants in household wastewater are nitrogen, phosphorus, and disease-causing bacteria and viruses. Nitrogen and phosphorus are aquatic plant nutrients that can cause unsightly algae blooms. Excessive nitrate-nitrogen in drinking water can cause pregnancy complications, as well as methemoglobinemia (also known as “blue baby syndrome”) in infancy. Pathogens can cause communicable diseases through direct or indirect body contact, or ingestion of contaminated water or shellfish. If a septic system is working properly, it will effectively remove most of these pollutants.
Veteran Home Inspections will be adding septic inspections to our available services in March 2018.  In the interim, we can also coordinate a septic inspection for you.  To schedule, call 210-202-1974 or visit www.vhillc.com to schedule online.