Showing posts with label structural inspection. Show all posts

Tuesday, June 9, 2026

Home Inspector Tips: Why Your Foundation Needs a Checkup


A beautiful contemporary custom home in Boerne, Texas, featuring limestone exterior and a large lawn on a sloped Hill Country lot.

Owning a home in Boerne or the surrounding Texas Hill Country is a dream for many. Between the rolling hills, the historic charm of Main Street, and the rugged beauty of the landscape, there is a lot to love. However, that very landscape: the ground beneath your feet: presents a unique set of challenges for your home’s structural integrity.

When you are buying or maintaining a property in this region, the foundation isn't just another part of the house; it is the most critical component. At Veteran Home Inspections, we have seen how the "Hill Country Hump" and the shifting seasons can take a toll on even the sturdiest slabs. Understanding why your foundation needs a regular checkup from a qualified home inspector Boerne, TX can save you thousands of dollars and provide the peace of mind you deserve.

The "Hill Country Hump": Understanding Our Unique Soil

To understand why foundation issues are so common here, you have to look at what’s under the grass. Boerne sits on a complex mix of shallow limestone and pockets of expansive clay. While limestone is generally a stable building platform, it is rarely a uniform surface.

Limestone vs. Expansive Clay

Most of our region is famous for its "white rock" or limestone. This is generally good news for homeowners because rock doesn't shrink or swell like the heavy clays found in San Antonio or Dallas. However, Boerne is also home to "pockets" of dark, plastic clay: especially in creek bottoms, low-lying areas, and lots where builders have brought in "fill" soil to level a sloped site.

When this clay gets wet, it expands with incredible force. When it dries out during our frequent Texas droughts, it shrinks, leaving gaps beneath your slab. This constant "push and pull" is what leads to foundation movement. Because your home may be sitting half on rock and half on clay, it can experience "differential settlement," where one side of the house moves while the other stays still. This is exactly why we focus so heavily on the site conditions during our Boerne home inspections.

A wide landscape shot of the rugged Texas Hill Country terrain near Boerne, showing limestone outcrops and native grasses.

Red Flags: Signs Your Foundation Is Moving

You don't need to be a structural engineer to spot the early warning signs of foundation distress. By keeping a close eye on your home, you can catch minor shifts before they become major structural failures. We recommend performing a "perimeter walk" at least twice a year to look for the following issues.

Exterior Warning Signs

  • Stair-Step Cracks: Look at your exterior masonry. If you see cracks that follow the mortar lines in a zigzag pattern, this is a classic sign of settlement.
  • Separation Around Windows and Doors: Are there gaps where the window frames meet the brick? If you see daylight or a widening gap that has been repeatedly caulked, the wall is likely pulling away.
  • Fascia and Soffit Gaps: Check the roofline. Gaps between the roof trim and the top of the wall often indicate that a corner of the foundation is dropping.

Interior Warning Signs

  • The "Sticky" Door: If a door that used to swing freely now rubs against the frame or won't latch properly, the house has likely shifted out of square.
  • Diagonal Cracks in Sheetrock: Look at the corners of your interior door frames and windows. Small hairline cracks are common, but diagonal cracks that are wide enough to fit a nickel are a cause for concern.
  • Sloping Floors: Do you feel like you are walking "downhill" in certain rooms? Or do your kids' marbles always roll to the same corner? This indicates a significant elevation change in the slab.

A close-up photograph of a stair-step crack in the exterior limestone veneer of a residential home.

The Water Factor: Managing Moisture for Stability

In the Texas Hill Country, water is the primary driver of foundation movement. Whether it’s a flash flood or a six-month drought, extreme changes in soil moisture lead to structural stress. Proper moisture management is the single most important thing you can do to protect your investment.

The Importance of Grading

The ground around your home should always slope away from the foundation. We look for at least a six-inch drop over the first ten feet. If the ground is flat or, worse, slopes toward the house, water will "pond" against the slab. This saturates the soil, causing it to lose its bearing capacity and allowing the foundation to sink.

Gutters and Downspouts

A standard roof can shed thousands of gallons of water during a heavy Boerne downpour. Without gutters, all that water falls directly at the base of your foundation walls. We strongly recommend installing gutters on all sides of the home and ensuring that downspouts discharge at least five to ten feet away from the house. Dumping water right at the corner of the slab is a recipe for a "settlement" disaster.

The Role of Landscaping

We love our Texas oak trees, but they are incredibly thirsty. A large tree can pull hundreds of gallons of water out of the soil every day. If a tree is too close to your home, it can dehydrate the soil on that side of the house, causing the foundation to drop while the rest of the house stays level. As your home inspector Boerne, TX, we evaluate the proximity of large vegetation to ensure it isn't sucking the life: and the stability: out of your soil.

Professional Maintenance: Your Foundation Checklist

Maintenance isn't just about fixing things when they break; it’s about prevention. To keep your Boerne home stable, we suggest following this checklist:

  1. Inspect Your Gutters Regularly: Ensure they are clear of leaves and debris. An overflowing gutter is just as bad as having no gutters at all.
  2. Monitor Soil Levels: Make sure you can see at least four to six inches of the concrete slab above the soil line. If mulch or dirt is piled up against the siding, it not only hides foundation cracks but also invites termites and rot.
  3. Use Soaker Hoses Wisely: During extreme droughts, the clay pockets in Boerne will pull away from the slab. You can use a soaker hose placed about 18 inches away from the foundation to keep the moisture level consistent. The goal isn't to make the ground muddy, but to keep it from cracking.
  4. Check Your Sprinkler Heads: Ensure your irrigation system isn't spraying directly against the house. Constant saturation in one spot can lead to localized "heaving."

Why You Need a Local Expert

While any inspector can find a crack, it takes a local expert to understand the context of that crack. The inspectors at Veteran Home Inspections have years of experience walking lots in Boerne, Fair Oaks Ranch, and Bergheim. We know the difference between a minor cosmetic shrinkage crack in the concrete and a structural failure caused by poor drainage on a Hill Country slope.

When we perform a standard home inspection, we don't just look at the house; we look at the entire environment. We assess the "lay of the land," the soil type, and the history of the area to give you a complete picture of the property's health. We provide detailed, digital reports within 24 hours so you can make informed decisions quickly.

A professional home inspector from Veteran Home Inspections kneeling to inspect a concrete slab foundation with a flashlight.

Conclusion: Protect Your Foundation, Protect Your Home

Your home’s foundation is its literal and figurative anchor. In the unique environment of the Texas Hill Country, you cannot afford to ignore the signs of movement or the importance of proper drainage. Whether you are a first-time homebuyer looking to make a smart investment or a long-time homeowner wanting to ensure your property stands the test of time, a professional foundation checkup is essential.

At Veteran Home Inspections, we take pride in our "boots on the ground" approach. As a veteran-owned business and Certified Master Inspectors, we bring a level of discipline and detail to every job that is unmatched in the industry. We offer military discounts and are committed to serving the Boerne community with integrity.

Don't wait until the doors won't close and the cracks are an inch wide. Schedule your inspection today and let us help you keep your home on solid ground.

Contact Veteran Home Inspections today at 210-202-1974 or request an inspection online to ensure your Boerne home is safe, stable, and secure.


Wednesday, April 22, 2026

7 Foundation Red Flags Every Homeowner in San Antonio Should Know

 Professional Home Inspector Examining Foundation in San Antonio

In the San Antonio area, the ground beneath your feet is constantly moving. Much of our region is built on expansive clay soil, which acts like a sponge: expanding when it rains and shrinking during our frequent South Texas droughts. This cycle of swelling and contracting places immense stress on a home’s foundation. At Veteran Home Inspections, we understand that a solid foundation is the bedrock of your investment. Ignoring the early warning signs of movement can lead to astronomical repair costs and a significant decrease in property value.

Whether you are preparing for a pre-listing inspection in San Antonio or you are a first-time buyer, recognizing these seven red flags is essential for protecting your home’s structural integrity.

1. Exterior "Stair-Step" Cracks in Brickwork

One of the most obvious signs of foundation settlement is the appearance of diagonal cracks in your exterior brick or stone. These cracks often follow the grout lines in a "stair-step" pattern. While hairline cracks in mortar can occur due to natural settling, gaps wider than 1/8th of an inch are a cause for concern.

Photo showing stair-step crack in brick wall


If you notice these cracks near the corners of your home or above window frames, it indicates that one portion of the foundation is sinking at a different rate than the rest. We recommend monitoring these areas closely; if the gap widens or the brick itself begins to crack, it’s time for a professional home inspection in San Antonio to assess the severity of the shift.

2. Interior Drywall Cracks Near Openings

The interior of your home often reveals structural stress before the exterior does. Look specifically at the upper corners of door frames and windows. Large, diagonal cracks extending toward the ceiling are a classic sign of foundation movement.

Photo of drywall cracking near a door


As the foundation shifts, the wooden or steel framing of the house twists. This torque pulls the drywall apart at its weakest points: the corners of openings. If you find yourself frequently patching these cracks only for them to reappear, the underlying issue isn't your paint job; it's the soil beneath your slab.

3. Doors and Windows That Stick or Won't Latch

Do you have a door that suddenly refuses to close properly? Or perhaps a window that feels jammed? When a foundation settles unevenly, door and window frames lose their "square" alignment.

This misalignment causes:

  • Doors that swing open or shut on their own.
  • Latches that no longer line up with the strike plate.
  • Windows that require excessive force to open or lock.

Before you shave down a door or replace a window, consider that the frame itself may be tilted. This is a common finding during our comprehensive property evaluations, often signifying that the perimeter of the foundation is losing support.

4. Uneven or Sloping Floors

If you feel like you’re walking uphill in your own living room, or if you notice a marble rolling across a hardwood floor, you likely have a significant foundation issue. In San Antonio homes, particularly those built on slab-on-grade foundations, the center of the slab can "heave" upward or the edges can "sink" downward.

Photo showing the framing of the house lifting off the foundation

At Veteran Home Inspections, we utilize specialized tools to detect slopes that are invisible to the naked eye. While a slight slope might seem like a minor nuisance, it often points to deeper issues with moisture control or soil compaction that must be addressed to prevent further damage.

5. Separation of Chimneys and Porches

Your chimney is one of the heaviest parts of your home's structure. Because it often sits on its own small foundation pad, it may settle differently than the main house. If you notice a gap forming between the chimney stack and the siding or roofline, the chimney is literally pulling away.

The same applies to porches and attached garages. Any visible separation where these structures meet the main body of the house is a red flag. These gaps also create entry points for moisture and pests, making it critical to schedule a termite inspection in San Antonio, TX to ensure that structural gaps haven't invited wood-destroying insects into your home.

6. Large Gaps in the Soil (Soil Shrinkage)

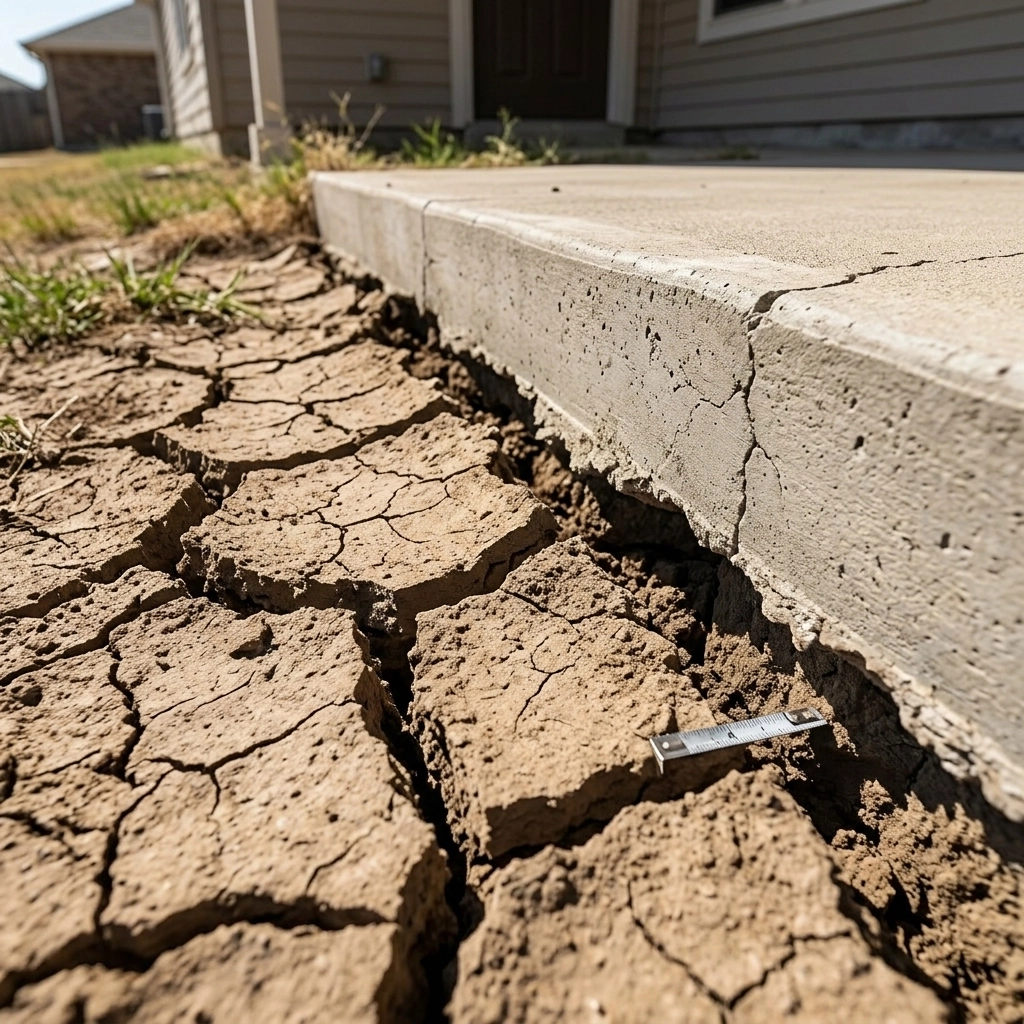
During our long, dry San Antonio summers, the clay soil loses moisture and pulls away from the concrete slab. If you can see a gap of an inch or more between the edge of your foundation and the dirt, your foundation is losing the lateral support it needs.

Dry cracked soil pulling away from foundation

When the soil shrinks this dramatically, the foundation becomes susceptible to "dropping." Conversely, when the rains finally return, water will pour into these gaps, causing the clay to swell rapidly and potentially crack the slab from the bottom up. Maintaining consistent moisture levels around your home's perimeter is a key preventative measure we discuss with our clients.

7. Unexpected Plumbing Issues or High Water Bills

Foundation movement and plumbing systems are inextricably linked. In San Antonio, many older homes have cast iron or PVC pipes buried beneath the slab. If the foundation shifts significantly, it can snap these pipes, leading to under-slab leaks.

A "slab leak" is a double-edged sword: the leaking water causes the surrounding clay soil to swell, which in turn pushes up on the foundation and causes even more movement. If you notice a sudden spike in your water bill, warm spots on your floor, or the sound of running water when all faucets are off, you may have a foundation-related plumbing failure.

Why Professional Inspection is Vital

Identifying these red flags early can save you tens of thousands of dollars in piering and leveling costs. A foundation issue rarely stays small; it is a progressive problem that affects every system in the house, from the roofline to the plumbing.

At Veteran Home Inspections, we bring a veteran’s discipline and a construction manager’s expertise to every job. Our goal is to provide you with a clear, unbiased picture of your home’s health. We don't just point out the cracks; we explain the "why" behind them and provide you with a detailed report within 24 hours so you can make informed decisions.

Whether you are worried about foundation shifts, need lead paint testing in San Antonio for an older home, or require a septic inspection in San Antonio for a rural property, our team is here to help.

Don't wait for a small crack to become a major catastrophe.

Contact Veteran Home Inspections today to schedule your comprehensive home evaluation.

Thursday, August 31, 2017

Flood-Damaged Homes & Buildings


by Nick Gromicko & Mike Marlow
 
Home and business owners should be prepared to protect themselves and their family members from the unique challenges posed by flood-damaged buildings. 
 
Hazards in and around flood-damaged buildings include the risks of:Good boots can protect against sharp debris in flood-damaged buildings
  • growth of large mold colonies;
  • septic system collapse;
  • trip-and-fall injuries;
  • structural collapse; 
  • fire and explosions; 
  • toxic sludge and materials containing waterborne bacteria; and 
  • electrical shock hazards.
Inspection Tips
  • Inspect the building exterior for downed power lines and gas leaks. Gas leaks will smell like rotten eggs. If you suspect a gas leak, contact the utility company immediately.
  • While entering the building, see if the door sticks at the top. If it does, this could mean that the ceiling is ready to collapse. After you open the door, stand outside the doorway, clear of any falling debris.        
  • Wear sturdy, treaded boots. According to the American Red Cross, the most common injury following a disaster is cut feet. Broken bottles, nails, glass, and other dangerous debris may litter the floor, and stairs may be very slippery.
  • Once you are inside the home, check for gas leaks again. If you smell gas or hear a blowing or hissing noise, open a window and quickly leave the building. Turn off the gas at the outside main valve, if you can, and call the gas company from a neighbor's home. If you turn off the gas for any reason, a professional must turn it back on. Never use an open flame inside of a flood-damaged house unless you know that the gas has been turned off and the house is ventilated. To inspect for damage, use a battery-powered lantern or flashlight, and not an open flame or electrical fixture in the house.
  • Do not use appliances that may have gotten wet unless you know they have been dismantled, cleaned and dried.
  • Do not work by yourself. If you are injured, it might take a long time before you receive assistance. If you must work alone, bring a cell phone or radio so you may call for assistance, if the need arises.
  • Bring a HEPA-rated respirator to use in case you detect extensive mold. If you are asthmatic or otherwise at heightened risk to mold exposure, leave the Large mold colonies have grown in this house, which was flooded when a water pipe burst building. Other personal safety equipment, such as gloves and coveralls, may also prevent contact with mold and other contaminants.
  • Examine doors, walls, windows, floors and staircases to make sure that the building shows no signs of potential collapse. Inspect for loose plaster, drywall, and ceilings that may fall. Also, inspect the foundation for evidence of cracks and other structural damage that may render the building uninhabitable.
  • Inspect for fire hazards, such as broken and leaking gas lines, flooded electrical circuits, and submerged furnaces and electrical appliances. Flammable and explosive materials may travel from upstream. Be aware that fire is the most frequent hazard in homes following floods.
  • Inspect for electrical system damage, such as broken and frayed wires, and burned insulation. You can turn off the electricity at the main fuse box or circuit breaker. If you have to step in water to get to the fuse box or circuit breaker, call an electrician first for advice. Electrical equipment should be inspected by a qualified professional and dried before being returned to service.  Salt water and brackish water can cause even more damage very quickly.
  • Inspect for sewage and water supply-line damage. If you suspect sewage lines have been damaged, avoid using the toilets and call a plumber. If water pipes are damaged, contact the water utility company and avoid operating the tap.
  • Use caution while inspecting crawlspaces for a variety of reasons, such as the presence of mold, sewage, asbestos, chemicals, rodents, and the risk of structural collapse.
  • Watch out for animals, especially poisonous snakes, which may have been washed into the building during the flood. You can use a stick to poke through debris to check for dangerous critters.
  • Food that has come into contact with floodwater may be contaminated and it must be thrown away.  Canned food may be salvageable if the can is not dented or damaged.
  • Sterilize water if it is of questionable purity. One easy way to do this is to boil it for at least five minutes. Water wells that may have been affected by floodwater should be pumped out and the water tested for purity before drinking.
  • Have exposed wires replaced by a qualified professional.
  • As much as possible, remove the mud and silt that has entered the home, both by shoveling and hosing the house down. Mud and silt contain sewage and chemicals from farms, factories, roads and buildings. Discard items, such as mattresses and wallboard, that may be contaminated by mud or silt.
  • Turn off the house’s electricity. Do this even if the power company has turned off electricity to the area.
  • Take pictures of the building and its contents for insurance purposes.
We here at Veteran Home Inspections wish everyone in the areas affected by Hurricane Harvey the best.  Take care and be safe.

Mike & Jamie Marlow
Veteran Home Inspections, PLLC
210-202-1974

Monday, May 29, 2017

Carbon Monoxide Poisoning and Detectors

Carbon monoxide (CO) is a colorless, odorless, poisonous gas that forms from incomplete combustion of fuels, such as natural or liquefied petroleum gas, oil, wood or coal.
 
Facts and Figures
  • 480 U.S. residents died between 2001 and 2003 from non-fire-related carbon-monoxide poisoning.
  • Most CO exposures occur during the winter months, especially in December (including 56 deaths, and 2,157 non-fatal exposures), and in January (including 69 deaths and 2,511 non-fatal exposures). The peak time of day for CO exposure is between 6 and 10 p.m.
  • Many experts believe that CO poisoning statistics understate the problem. Because the symptoms of CO poisoning mimic a range of common health ailments, it is likely that a large number of mild to mid-level exposures are never identified, diagnosed, or accounted for in any way in carbon monoxide statistics.
  • Out of all reported non-fire carbon-monoxide incidents, 89% or almost nine out of 10 of them take place in a home.
Physiology of Carbon Monoxide Poisoning
When CO is inhaled, it displaces the oxygen that would ordinarily bind with hemoglobin, a process the effectively suffocates the body. CO can poison slowly over a period of several hours, even in low concentrations. Sensitive organs, such as the brain, heart and lungs, suffer the most from a lack of oxygen.
High concentrations of carbon monoxide can kill in less than five minutes. At low concentrations, it will require a longer period of time to affect the body. Exceeding the EPA concentration of 9 parts per million (ppm) for more than eight hours may have adverse health affects. The limit of CO exposure for healthy workers, as prescribed by the U.S. Occupational Health and Safety Administration, is 50 ppm.
 
Potential Sources of Carbon Monoxide

Any fuel-burning appliances which are malfunctioning or improperly installed can be a source of CO, such as:
  • furnaces;
  • stoves and ovens;
  • water heaters;Cars should never be left running in a garage
  • dryers; 
  • room and space heaters; 
  • fireplaces and wood stoves;
  • charcoal grills;
  • automobiles;
  • clogged chimneys or flues;
  • space heaters;
  • power tools that run on fuel;
  • gas and charcoal grills;
  • certain types of swimming pool heaters; and 
  • boat engines.


PPM
% CO 
in air
Health Effects in Healthy Adults
Source/Comments
0
0%
no effects; this is the normal level in a properly operating heating appliance

35
0.0035%
maximum allowable workplace exposure limit for an eight-hour work shift
The National Institute for Occupational Safety and Health (NIOSH)
50
0.005%
maximum allowable workplace exposure limit for an eight-hour work shift
              OSHA
100
0.01%
slight headache, fatigue, shortness of breath, 
errors in judgment

125
0.0125%

workplace alarm must sound (OSHA)
200
0.02%
headache, fatigue, 
nausea, dizziness

400
0.04%
severe headache, fatigue, nausea, dizziness, confusion; can be life-threatening after three hours of exposure
evacuate area immediately
800
0.08%
convulsions, loss of consciousness;
death within three hours
evacuate area immediately
12,000
1.2%
nearly instant death


CO Detector Placement

CO detectors can monitor exposure levels, but do not place them:
  • directly above or beside fuel-burning appliances, as appliances may emit a small amount of carbon monoxide upon start-up;
  • within 15 feet of heating and cooking appliances, or in or near very humid areas, such as bathrooms;
  • within 5 feet of kitchen stoves and ovens, or near areas locations where household chemicals and bleach are stored (store such chemicals away from bathrooms and kitchens, whenever possible);
  • in garages, kitchens, furnace rooms, or in any extremely dusty, dirty, humid, or greasy areas;
  • in direct sunlight, or in areas subjected to temperature extremes. These include unconditioned crawlspaces, unfinished attics, un-insulated or poorly insulated ceilings, and porches;
  • in turbulent air near ceiling fans, heat vents, air conditioners, fresh-air returns, or open windows. Blowing air may prevent carbon monoxide from reaching the CO sensors.
Do place CO detectors:
  • within 10 feet of each bedroom door and near all sleeping areas, where it can wake sleepers. The Consumer Product Safety Commission (CPSC) and Underwriters Laboratories (UL) recommend that every home have at least one carbon monoxide detector for each floor of the home, and within hearing range of each sleeping area;
  • on every floor of your home, including the basement (source:  International Association of Fire Chiefs/IAFC);
  • near or over any attached garage. Carbon monoxide detectors are affected by excessive humidity and by close proximity to gas stoves (source:  City of New York);
  • near, but not directly above, combustion appliances, such as furnaces, water heaters, and fireplaces, and in the garage (source:  UL); and
  • on the ceiling in the same room as permanently installed fuel-burning appliances, and centrally located on every habitable level, and in every HVAC zone of the building (source:  National Fire Protection Association 720). This rule applies to commercial buildings.
In North America, some national, state and local municipalities require installation of CO detectors in new and existing homes, as well as commercial businesses, among them:  Illinois, Massachusetts, Minnesota, New Jersey, Vermont and New York City, and the Canadian province of Ontario. Installers are encouraged to check with their local municipality to determine what specific requirements have been enacted in their jurisdiction.
How can I prevent CO poisoning?
  • Purchase and install carbon monoxide detectors with labels showing that they meet the requirements of the new UL standard 2034 or Comprehensive Safety Analysis 6.19 safety standards.
  • Make sure appliances are installed and operated according to the manufacturer's instructions and local building codes. Have the heating system professionally inspected by an InterNACHI inspector and serviced annually to ensure proper operation. The inspector should also check chimneys and flues for blockages, corrosion, partial and complete disconnections, and loose connections.
  • Never service fuel-burning appliances without the proper knowledge, skill and tools. Always refer to the owner's manual when performing minor adjustments and when servicing fuel-burning equipment.
  • Never operate a portable generator or any other gasoline engine-powered tool either in or near an enclosed space, such as a garage, house or other building. Even with open doors and windows, these spaces can trap CO and allow it to quickly build to lethal levels.
  • Never use portable fuel-burning camping equipment inside a home, garage, vehicle or tent unless it is specifically designed for use in an enclosed space and provides instructions for safe use in an enclosed area.
  • Never burn charcoal inside a home, garage, vehicle or tent.
  • Never leave a car running in an attached garage, even with the garage door open.
  • Never use gas appliances, such as ranges, ovens or clothes dryers to heat your home.
  • Never operate un-vented fuel-burning appliances in any room where people are sleeping.
  • During home renovations, ensure that appliance vents and chimneys are not blocked by tarps or debris. Make sure appliances are in proper working order when renovations are complete.
  • Do not place generators in the garage or close to the home. People lose power in their homes and get so excited about using their gas-powered generator that they don't pay attention to where it is placed. The owner's manual should explain how far the generator should be from the home.
  • Clean the chimney. Open the hatch at the bottom of the chimney to remove the ashes.  Hire a chimney sweep annually.
  • Check vents. Regularly inspect your home's external vents to ensure they are not obscured by debris, dirt or snow.
 

In summary, carbon monoxide is a dangerous poison that can be created by various household appliances. CO detectors must be placed strategically throughout the home or business in order to alert occupants of high levels of the gas.

To schedule your home inspection in San Antonio, TX, call 210-202-1974 or book online at www.vhillc.com

Friday, September 2, 2016

What Really Matters in a Home Inspection

Buying a home?
The process can be stressful. A home inspection is supposed to give you peace of mind but, depending on the findings, it may have the opposite effect. You will be asked to absorb a lot of information over a short period of time.  Your inspection will entail a written report, including checklists and photos, and what the inspector tells you during the inspection. All of this combined with the seller's disclosure and what you notice yourself can make the experience overwhelming. What should you do?
Relax.
Home inspectors are professionals, and since I am a member of InterNACHI, then you can trust that I am among the most highly trained in the industry. Most of your inspection will be related to maintenance recommendations and minor imperfections. These are good to know about.
However, the issues that really matter will fall into four categories:
  1. major defects, such as a structural failure;
  2. conditions that can lead to major defects, such as a roof leak;
  3. issues that may hinder your ability to finance, legally occupy, or insure the home if not rectified immediately; and
  4. safety hazards, such as an exposed, live buss bar at the electrical panel.
Anything in these categories should be addressed as soon as possible. Often, a serious problem can be corrected inexpensively to protect both life and property (especially in categories 2 and 4).
Most sellers are honest and are often surprised to learn of defects uncovered during an inspection. It’s important to realize that a seller is under no obligation to repair everything mentioned in your inspection report. No house is perfect. Keep things in perspective.
And remember that homeownership is both a joyful experience and an important responsibility, so be sure to call on your InterNACHI Certified Master Inspector® to help you devise an annual maintenance plan that will keep your safe and your home in top condition for years to come. 

For more about the services offered by Veteran Home Inspections, PLLC, please visit www.vhillc.com

Adapted from https://www.nachi.org/matters.htm by Nick Gromicko

Tuesday, August 11, 2015

An Open Letter to Real Estate Investors (i.e. Flippers)

As a home inspector in Maryland, D.C., Virginia, and Texas, I see a lot of homes that have been flipped.  Some are well done, and are homes that I wouldn't mind living in.  Unfortunately, this is the rarity.  The vast majority of them are poorly done, if not down-right dangerous.  The sad part of it is, I have to break this news to the buyers that have fallen in love with a house that looks really nice, with the brand new kitchen and bathrooms, nice hardwood floors, and beautiful landscaping.  When I start showing them all the areas where the flipper took shortcuts, I can see the disbelief building in their faces until it becomes straight-up anger.  Sometimes this leads to a huge list of items on the repair addendum, and sometimes just an outright cancellation of the contract.

So, why am I telling you all of this?  Chances are, that some of you reading this have had a deal fall apart after an inspection, and you probably blamed it on the over-zealous home inspector.  I'm writing today to tell you how to avoid this situation altogether, and hopefully make more money.  See, I don't personally have anything against flippers.  I am one myself!  I see the benefit you could provide to a community, and to the buyers of the houses you renovate.  By doing a few simple things, you can actually provide a better product, reduce stress on everyone involved in the transaction, and likely make more money!

First off, let's go over the common things I find on flipped houses.  Then I'll tell you the secrets to preventing these issues.

Permits!  Yes, you most likely need them.  And with today's online systems, it's really easy to see if you pulled permits, and if you got the final inspection.  In most jurisdictions, you need permits if you are going to knock out a wall to make the desired open-concept layout, or if you need to replace things like the HVAC, water heater, or electric panel, or finish a basement.  When I see any of this work done on a home I'm inspecting, I automatically insert a note to the buyer to check with the local jurisdiction to see if permits were pulled and final inspections passed.  Guess what happens when they find out this wasn't done?

Use a licensed contractor.  If your area requires contractors to have a license, make sure they are actually licensed.  I am also an FHA 203(k) consultant, and part of my job is to verify contractor licenses.  There are a lot of people out there flying under the radar claiming to have a license.  This not only helps to ensure they do quality work, but it protects you from unlicensed (and probably uninsured) contractors screwing up your investment.  Also, unless you actually know what you're doing, it's easy to see the work done by unlicensed individuals.  YouTube is great for entertainment, but that how-to video on electrical repairs is likely going to lead to trouble.

Electrical.  This one really deserves its own post, but I'll hit the highlights here.  One of the most common issues I see is outdated electrical panels.  This can be easily fixed for a couple thousand dollars, but is often overlooked.  And while you have the electrician there, spend a bit more to have them check over the entire electrical system.  I often find poor electrical work in the attic and basement where someone just decided to tap into a circuit to add the recessed lights, or the electric for the new island in the kitchen.   Another big one to watch out for is the actual wiring.  There are two things you need to be careful of.  Knob & Tube and solid strand aluminum.  K&T wiring was used in the early 20th century, and is easy to identify by the porcelain knobs and tubes along the wiring.  It's very outdated, and many home insurance companies will require that it be replaced before insuring the home.  While I have found occasions where the system was still present in the attic, the most common situation I see is that it's been cut out and replaced in the attic/basement.  However, you need to remember that the whole house was wired with this system.  If you have a home with K&T, it will need to be completely rewired.

Aluminum wiring was commonly used in the 60s and 70s as a cheaper alternative to copper wiring.  While multistrand aluminum is still used today on larger circuits (main service entry, AC compressors, electric ovens, etc.) and is perfectly safe there, we are concerned with the solid strand aluminum used on the smaller branch circuits (lights, plugs, etc.)  You should have your licensed electrician check the house for aluminum branch circuits, and if it's found you can either replace it (preferred) or have them make sure the connections are properly made.  Of note, there are not any approved wire nuts for copper-aluminum connections.  For a CPSC article on aluminum wiring, click here.  Once they have done this, have them certify this in writing.

Water intrusion.  Very simply, invest in a moisture meter and learn how to use it.  Nothing scares a potential buyer like water in the basement.  Check the basement periodically throughout your project, and especially after a good rain, and make sure it's staying dry.  If it isn't, get it fixed.  Also, the various brands of interior waterproofing paint don't fool the moisture meter.

Plumbing issues.  I have inspected houses where water was literally coming out of the side of the house.  Going back to the previous section on water intrusion, water issues in general will scare a buyer away.  Pay a licensed plumber to check, and fix, the system.  Once they are done, run the fixtures and check for leaks.  Fill up the sinks and tubs and drain them a few times.  Check underneath them with your moisture meter after about 30 minutes to make sure they aren't leaking.  Also, check for polybutylene piping.  This is a plastic piping used from 1978-1995, and is easily identified by looking for PB2110 on the labeling.  If you find it, have it replaced.

Decks.  Again, this is one that could occupy a whole post.  Every year I see multiple stories about deck collapses.  If you follow the story past the initial coverage, you will often find that the cause was found to be either that it was unpermitted or unmaintained.  If you have a deck in decent condition, still have it checked to make sure it was constructed properly and is in good material condition.  If you need a new one, make sure it's built right, and to code.  I regularly see new decks that are just one house-warming party away from disaster.

Roofs.  Take a moment to look up.  Along with the whole water issue, roofs scare buyers (probably because the roof keeps the water out).  Buyers also tend to think roofs are super expensive.  If the roof is nearing (or beyond) the end of its serviceable life, get it replaced.  Some signs of a failing roof are curling, broken, or missing shingles, moss growth, water stains on the interior ceilings, and depressions between the roof trusses.  When you have a roof replaced, make sure the roofer replaces the flashing, plumbing boots, and any deteriorated sheathing.  I recently had an inspection where the flipper put new shingles on, but didn't replace the multiple areas of rotted sheathing.  Now he's paying for another new roof.

So, by now you're probably having visions of an empty checking account and wondering how doing all of this is going to make you more money.  Here's how: the home inspector can be an ally instead of the enemy.

When you are looking to purchase a property, have it inspected.  This will give you a very good idea of what needs to be repaired, and help you build your budget.  Then you can get the property at the right price.  If you can't get an inspection contingency, hire a home inspector to go look at houses with you.  While not ideal, we can still give you a very good idea of the major issues.  If you get an inspection done, you can then use that inspection report to help you negotiate a price that accurately reflects the condition of the property.  A hint, if you're buying an REO, put a summary of the issues in the body of the email.  REO agents will not open an inspection report, since then they would have to disclose those issues to the next buyer.  If they're in the body, they have now been informed.

Once you are done with the renovations, have the inspector come back and do a MoveInCertified™ inspection and use that as a marketing tool.  The last house I personally flipped, the buyer's agent admitted he tried to steer his clients away from a flipper house.  After the buyer's inspection, I had to replace one 50¢ outlet that had broken.  The buyer's agent actually went out of his way to compliment us on the quality of work and lack of issues on a 115-year old home.  The other benefit of a MoveInCertified™ inspection is that you don't have to worry about failing to disclose a material defect.  You can include the inspection report in your disclosure to buyers.  The worst case scenario is, you can go back to your licensed contractor and have them fix it (hopefully for free if they screwed up to begin with).  Not only do buyers now see the condition of the house, they also see that you are trying to be as open and honest as possible.

If you follow this plan, you won't have to worry about the buyer's inspection anymore.  You will already know what the condition of the house is from a home inspection standpoint.  You've already fixed or disclosed any issues, and you're ready for them to inspect it.  No more last minute surprises.  Now the buyer's inspection is just confirmation of your quality product instead of an impending nightmare.

It may seem that I've just presented a way for you to spend more money and put more in my pocket.  Well, chances are, the house is going to get inspected.  How many times have you seen a house you were interested in go under contract and then come back on the market within 10 days?  Have you ever lost a contract after the inspection found several issues?  When this happens, you now have to fix or disclose those issues, and you keep accruing your holding costs until you find a new buyer.  You also may be forced into dropping the price.  Wouldn't it be cheaper to just do things right the first time and sell it faster?

If you're in the San Antonio, TX area, call us to help you at 210-202-1974, or email mike@vhillc.com.  You can also book online at www.vhillc.com. If you're somewhere else, go to www.certifiedmasterinspector.org to find a certified inspector that can offer you a MoveInCertified™ inspection.


Saturday, January 31, 2015

What were they thinking?

As promised, a summary of the interesting things I found on yesterday's home inspections.  These were two nice looking homes that had some serious issues.  Enjoy!

As Paul Harvey would have said, here is the rest of the story on the teaser video I posted yesterday.  When my client and I were in the crawlspace, I bumped into a support pillar, and it moved, a lot!  There were several pillars installed with dry-stacked cinder blocks (no mortar at all).  They were all loose, and no longer providing support to the beams supporting the floor joists.  They may have provided support when they were installed, but without the necessary footers, they had settled and were no longer supporting the beams.


The three columns in this picture were all loose, and yes, that first one really was leaning as much as it appears.  The beam above it was quite loose and could be moved by hand.


While in the crawlspace, we noticed a lot of water on the underside of the vapor barrier.


Unfortunately, the vapor barrier was only partially installed, which was probably the cause of the increased moisture in the crawlspace materials.


This is the reading from the moisture meter in the above picture.  As you can see, it's wet!  This can not only lead to mold, but also rot and wood destroying insect infestation.


Which might have been the cause of the mold-like substance we found growing on the joists and subfloor.


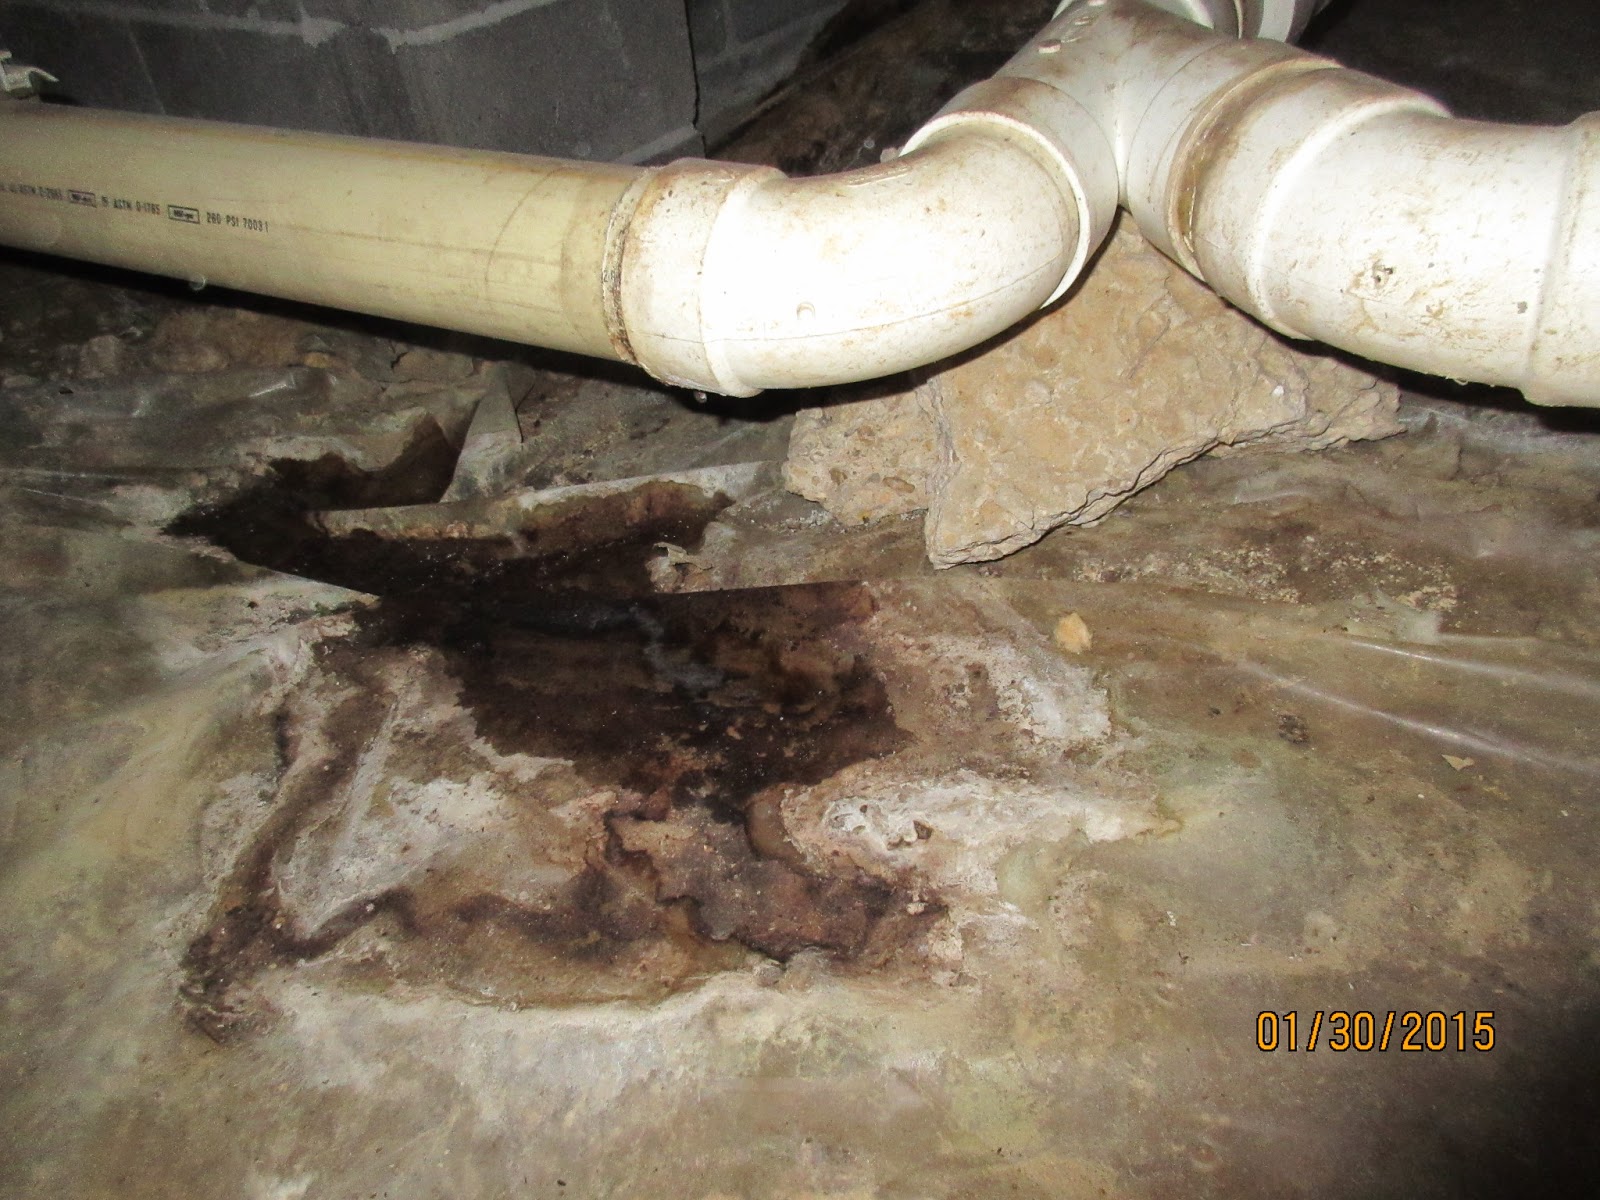
Or maybe the moisture was coming from the sewage leaking from the drain lines.


Either way, it was causing a lot of corrosion to the electrical system components.


This is what happens when your toilet is loose and the wax ring doesn't seal anymore.


The attic wasn't immune to moisture problems either.  Where do your bathroom exhaust fans terminate.  The correct answer should be outside.  The black stuff on the underside of the roof sheathing wasn't paint...


And the electrical issues continued in the attic too!


Those were all just from the morning inspection.  Now on to the afternoon inspection.

The electrical in this attic was just as good as the first house.  


The yellow and orange wires were connected to a plug and then ran across the attic to a bedroom closet ceiling light.


These wires almost made it to the junction box, I guess the electrician didn't have his wire stretcher with him.


There are a couple issues in this picture.  First, the duct work is the supply side, and is not insulated.  This can be a huge energy loss and they should have used insulated duct work.  The other issue, is a bit more serious.  The metal tab on the rafter is where a truss member used to be.  I guess the HVAC duct was more important than the roof support.


Of course when you look at how they installed the HVAC itself, you get the idea that maybe this wasn't a professional job.  The outside AC compressor was from 2001, and I would guess the inside unit was the same.  I can only guess, because that vertical truss member was obscuring the data plate.  It was also preventing the access cover from being removed, so I'd pretty much guarantee the inside of the unit has never been checked or cleaned.  


This is the view of the fireplace flue looking from the attic above the 2nd floor all the way to the fireplace on the first floor.  In the unfortunate event of a fire, it would be able to quickly spread from the first floor to the attic.  This is one of the primary reasons we stopped using balloon construction in houses.


These are the drain lines for what I suspect is an unpermitted half bath. Drain lines are not supposed to be this steep, unless they are more than 45 degrees down angle.  Steep slopes (more than 1/2":12" up to 45 degree supposedly lead to clogs as the water leads the solids behind.  


This was a floor joist in the new addition (done with a permit) but the code inspector missed this one.  For some reason plumbers forget to reinforce the joists the hack away when they need to run their plumbing in the same place.


That's all for now folks.  Stay safe out there, and remember to hire the best home inspector you can find.  For more on our services, check out www.vhillc.com